The chapter describes the use and customization of the Pst Viewer Pro User Interface.
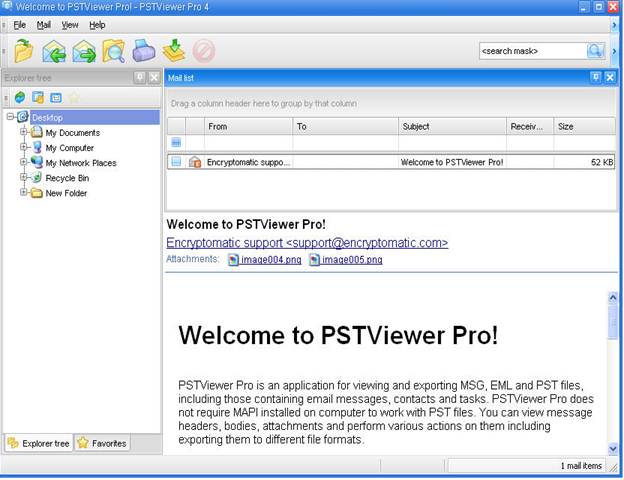
Main window of Pst Viewer Pro consists of following logical zones: Mail list, Message viewer, Explorer, Favorites, Status bar, Toolbar and Main menu.
Pst Vieewer Pro Explorer shows the folders available on your computer and network. Upon clicking a folder, these messages will be added to the Mail list.
The Mail list is a table containing information about messages in active folder. Messages can be sorted, filtered and grouped by their attributes.
Message viewer displays header, body and attachments of a message, selected in Mail list.
Status bar shows description of hovered user interface elements, name and status of current action, number of messages in active folder and other information.
Toolbar and Main menu provide access to a number of application tweaks and customizations and can be used to perform mail actions.
[ Back ]
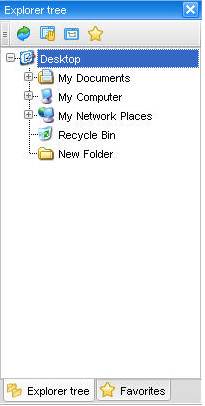
Pst Viewer Pro's Explorer shows the folders available on your computer and network. Upon clicking on a folder, these messages will be added to the mail list.
The Explorer lists folders, remote computers and network shared folders. Messages located in one of these places can be added to Mail list either by selecting item, or by right-clicking an item and selecting Scan folder from context menu. If the "Scan folder with subfolders" item is checked, messages in subfolders will be also displayed.
You can refresh folder to update display of recently renamed, created or deleted items by clicking the "Refresh" button on the toolbar or by selecting it in the context menu.
Open in explorer context menu item and toolbar button are used for opening selected folder in Windows explorer.
Properties context menu item and toolbar button shows standard system properties dialog for selected folder.
"Add to favorites" toolbar button adds the selected folder to the Favorites list for easy access.
Docking functionality can be used to change the default position for the Explorer.
[ Back ]
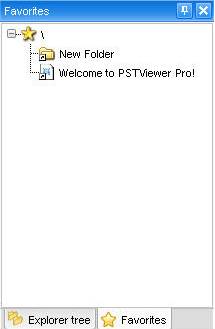
PstViewer Pro's Favorites list is a structure that allows quick access to frequently used folders and messages. Messages located in one of the folders can be added to Mail list either by selecting item, or by right-clicking it and selecting Browse or "Browse with subfolders" from the context menu.
To add a folder to favorites, select it in the Explorer and click the "Add to favorites" button on the toolbar. Messages may also be added to favorites by dragging them from Mail list to the Favorites window.
Folders can be manually created in the Favorites window by selecting a node and clicking "New folder" in the context menu. A new folder will be created as a child of the selected item.
Edit item name context menu item can be used to change selected folder's name.
Delete context menu item is used for deleting folders.
Docking functionality can be used to change the default position for Pst Viewer Pro's Explorer.
[ Back ]
Pst Viewer Pro's Mail list is a table, containing information about messages in active folder. Messages can be sorted, filtered and grouped by their attributes.
Mail list contains following columns: selector column, file type icon column and message attributes columns: subject, from, to, CC, BCC, delivery time, submit time, has attachments, internal path, source format, source path. User can select which columns to show in the table and which to hide.

Icons displayed for the email messages in the Mail list differentiate between the email file types, relating to the source of the email messages as well as the presence of file attachments. For example, emails originating from within an Outlook .pst file will appear with a "P". Emails originating from a .msg file will have an "M" and .eml files will display a "E".
Right-clicking on a line in the mail list brings the context menu for that selected message.
The "Open message" context menu item is used to open selected email message in a default email client.
Mail list view allows disabling of filtering and grouping capabilities of the Mail list component in case user does not need them.
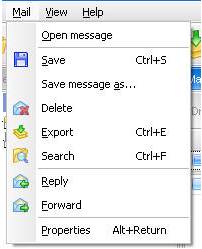
Save context menu item allows user to save selected message in the specified folder preserving the same file name this message already has.
Save message as... context menu item allows user to save selected message in the specified folder with custom file name.
Export context menu item performs export action on selected message. User will be prompted to select and/or customize export profiles.
Properties context menu item displays Mail information dialog which shows information about message header and file properties and allows to view message's raw transport header and MAPI properties.
Note: Open message, Save message as... and Properties menu items are unavailable when multiple messages are selected.
[ Back ]
Mail list provides powerful tools for sorting, filtering, grouping email messages and column management.
You can select which columns to display in the table by clicking Column Chooser in header context menu and dragging required columns from Customization window to the table. The order of the columns can also be changed using drag and drop.
The simplest way to create filter is to enter a value in one of the fields above the table. The contents of the table will be filtered according to the inputted data in the corresponding column. Resulting filter can be seen the the bottom of the table. It can be disabled and cleaned by unchecking checkbox near its description or clicking [x] button.
Another way to filter messages is clicking filter button in the column header (visible when mouse is hovering the header). It will bring a list of possible values for filter current column. This list will differ depending on column data type. For example, for subject column filtering values would include "Blank fields", "Non-blank fields", list of subjects of messages currently in the table and custom filter editor. For received time column filter would allow selecting date from Date picker control or selecting one of the predefined time-filtering options like "Earlier this year" or "Last week".
Any of the earlier created filter rules can be picked from list, that will appear after clicking on the current filter rule.
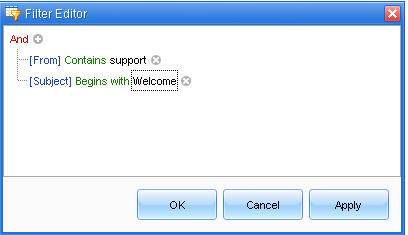
Filter editor dialog can be used for more advanced filtering rule editing. It can be used either to create filter from scratch or to modify already created filtering rule. Filter editor can be called by selecting Filter editor... in column header context menu or by clicking Edit filter button in right bottom corner of the Mail list if filter is already created.
Filter editor creates logical constructs that are used for table filtering. These constructs are one or several logical conditions united by one of the logical operations (AND, OR, NOT AND, NOT OR). Logical conditions consist of comparisons contents of the columns with proposed value.
Message grouping can be done by the values of one or several columns in the table. To perform grouping, drag the column header into to grouping panel. It is possible to perform grouping by several columns. In this case, nesting order of the grouping columns will be determined by their relative position in grouping panel. It can be changed by dragging column headers inside of the grouping panel. To cancel grouping, drag column headers back into the table.
Docking function can be used to change the default position for the Explorer.
[ Back ]
Main menu of Pst Viewer Pro consists of 4 top-level items - File, Mail, View and Help.
Please note, that main menu is completely customizable. This article describes elements in order they are grouped by default. Check User interface tweaks article for more information.
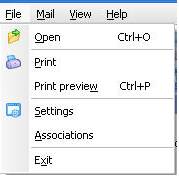
File menu contains the following items:
Open menu: this item is used to open message file of one of the supported formats in Pst Viewer Pro. Messages contained in selected file will be listed in mail list.
Settings: this menu item brings Settings dialog, that allows user to set font used in application and interface reactivity time. See Settings article for more details.
Associations: this menu item allows user to associate MSG, EML and PST files with Pst Viewer Pro.
[ Back ]
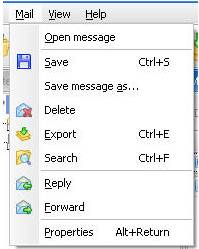
The Mail menu contains the following items:
Open: used to open selected message in a default email client.
Save: allows user to save selected message in the specified folder preserving the same file name this message already has.
Save message as... : allows user to save selected message in the specified folder with custom file name. Delete menu item closes all messages opened in Pst Viewer Pro and quits the application.
Search: opens the Search dialog window.
Export: performs export action on selected message. User will be prompted to create, select and/or customize export profiles.
Print: this menu item prints selected message using default printer and default printing settings.
Print preview: opens Preview window that allows various settings and customizations related to the process of printing. Check Print preview article for more information.
Reply: item opens default email client with a reply to a sender of a selected message. Forward menu item opens default email client, forwarding selected message to selected recipients.
Properties: menu item displays Mail information dialog which shows information about message header and file properties and allows to view message's raw transport header and MAPI properties.
Note: see Mail actions section for more information about each of the actions, performed by items of Mail menu.
Note: only Search menu item is available when no messages are present in mail list. Open message, Save message as..., Reply and Properties are unavailable when selecting multiple messages.
[ Back ]
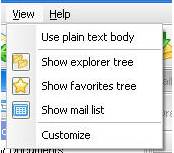
The View menu contains following items:
Use plain text body: switches display of all messages in Message viewer to plain text body. In plain text mode, contents of message body will be displayed without formatting.
Show Explorer: toggles visibility of Explorer panel.
Show Favorites: toggles visibility of Favorites panel.
Show mail list: toggles visibility of Mail list panel.
Change docking to default item allows user to set all panels to default positions.
Customize menu item opens Customization window with menu and toolbar options.
[ Back ]
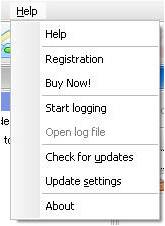
Pst Viewer Pro's Help menu contains following items:
Registration: Opens a dialog that allows you to register your copy of Pst Viewer Pro.
Buy Now: Opens a webpage where user can purchase a copy of Pst Viewer Pro. The page will be opened in default browser.
Start Logging: When Start logging menu item is selected, Pst Viewer Pro starts logging internal information into a text file. (User will be asked to specify its name and location). This file can be emailed to Pst Viewer Pro's technical support team to help resolve a problem situation.
Check for updates: checks if a newer version of Pst Viewer Pro is available.
Update settings: Opens configuration dialog for updater.
About: Displays information about PST Viewer Pro and your license activation key.

Pst Viewer Pro Toolbar contains buttons used for quick access to a number of mail actions and search tools.
By default, the buttons present on Toolbar are Open, Reply, Forward, Print, Export, Stop, and Search edit box with Search button.
Please note, that elements of Toolbar are completely customizable. Check User interface tweaks article for more details.
Mail actions items Open toolbar button is used to open message file of one of the supported formats in Pst Viewer Pro. Messages contained in selected file will be listed in Mail list. Reply toolbar button opens default email client with a reply to a sender of a selected message. Forward toolbar button opens default email client, forwarding selected message to selected recipients.
Print toolbar button prints selected message using default printer and default printing settings. Export toolbar button performs export action on selected message. User will be prompted to select and/or customize export profiles.
Stop toolbar button can be used to stop any mail action that takes time to perform.
Search items Search edit box field can be used to make quick search in the messages opened in mail list. Search button inside Search edit box field opens Search messages dialog, which offers advanced search options. See Search messages dialog topic for more information.
[ Back ]
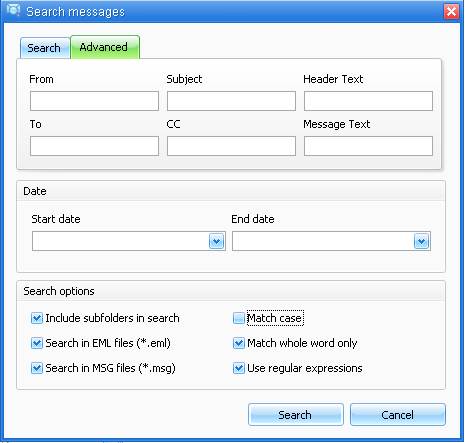
Search messages dialog is used to search contents of messages. On Search tab user enters text in Text to search field. The specified text is searched for in message headers and bodies.
On Advanced tab it is possible to specify in which part of message to perform search. Text can be searched for in From, Subject, CC, From message properties, the whole Header text or Message body.
Date block is used for date-limited searches. User can specify Start Date, End Date fields or both of them to provide time limitation for searches. Please note, that value in End Date field should always be later than value Start Date.
If Include subfolders in search option is checked, a search will be performed recursively in specified folder and its subfolders. Include *.eml and Include *.msg checkboxes allow limiting searches only for files of certain type.
Match case enforces that hits have exactly the same case as the query. If this is disabled, the search is case insensitive.
Match whole word only will only result in a hit if the match consists of an entire word, not if it's partial (for example (but not limited to), whitespace separated). In Regular Expression, the query will be handled like a regular expression.
List of special characters:
. - any character
\w - word character (letter or digit)
\d - decimal digit
\s - white-space character (space or tab)
* - 0 or more matches of the previous element
+ - 1 or more matches of the previous element
? - 0 or 1 match of the previous element
[ ] - group of symbols, for example [ABC]+ CAB - matches, CAD - doesn't match
\ - escape character "\." if you need dot symbol
| - OR operator, th(e|is|at) matches "the" and "this" in "this is the day"
After Match whole word only and Use regular expressions checkboxes are set to be active, Regular expression will be searched among separate words of text that meets searching results. Modificators (‘^’, ‘$’, \b) will be removed in case they were previously used.
For more detailed criteria of searching for messages, please see filtering options of Mail list.
[ Back ]
Command line interface of Pst Viewer Pro can be accessed via:
PSTViewerConsole.exe
This file is located in the same directory as PstViewer.exe.
Usage: PSTViewerConsole.exe [options] [<file1> [<file2> ...]]
Options description:
h, help
Show usage description.
Usage: PSTViewerConsole.exe --help
a, associate
Associate specified file extensions with application.
Usage: PSTViewerConsole.exe --associate <format[s]>
p, print
Print specified message to default or specified printer.
Usage: PSTViewerConsole.exe --print <file[s]>
e, export
Export messages with predefined profile.
Usage: PSTViewerConsole.exe --export <profile> <file[s]>
Example:
"C:\Program Files\Encryptomatic, LLC\Pst Viewer Pro\PSTViewerConsole.exe" --e "PDF - attachments converted/included" "C:\your_file.msg"
"C:\Program Files\Encryptomatic, LLC\Pst Viewer Pro\PSTViewerConsole.exe" --e "PDF - attachments converted/included" "C:\your_folder_with_messages"
Customize export for PST/OST.
To specify extended format please add the next fields to the end of path:
{1} {2} | {3}
where:
{1} = :: [begin extended command]
{2} = <internal path inside PST/OST file> [for example: \Indox\John Doe] | [delimeter]
{3} = T or F [T - export with subfolders (recursively), F - export without subfolders]
All parts are mandatory if :: is specified after file path.
Examples:
Export Inbox folder from pst file (without subfolders):
"C:\Program Files\Encryptomatic, LLC\Pst Viewer Pro\PSTViewerConsole.exe" --e "PDF - attachments converted/included" "C:\your_psf_file.pst::\Inbox|F"
Export Inbox\NewFolder folder from pst file with subfolders:
"C:\Program Files\Encryptomatic, LLC\Pst Viewer Pro\PSTViewerConsole.exe" --e "PDF - attachments converted/included" "C:\your_psf_file.pst::\Inbox\NewFolder|T"
c, command
Load command line switches from specified file.
Usage: PSTViewerConsole.exe --command <file>
w, nobrowse
Disable messages loading at startup.
Usage: PSTViewerConsole.exe --nobrowse
r, runprofile
Choose profile with GUI layout.
Usage: PSTViewerConsole.exe --runprofile <profile name>
l, log
Turn on the log file.
Usage: PSTViewerConsole.exe --log <file>
i, printer
Specify default printer.
Usage: PSTViewerConsole.exe --printer <name>
k, key
Register the application with specified serial key for current user. Key will be applied during next start of application.
Usage: PSTViewerConsole.exe --key <serial key>
m, mkey
Register the application with specified master key for local machine. Key will be applied during start of unregistered application. Administrative privileges are required for this command.
Usage: PSTViewerConsole.exe --mkey <serial key>
delkey
Erase serial key for current user.
Usage: PSTViewerConsole.exe --delkey
delmkey
Erase master key for local machine. It will not influence already registered copies, but for new users the application will be unregistered.
Usage: PSTViewerConsole.exe --delmkey
g, gui or GUIFLAGS
Configure visibility of GUI elements.
Usage: PSTViewerConsole.exe --gui <element1,element2[,...]>
or
Pst Viewer .Setup-4.x.x.xxxx.exe GUIFLAGS="<element1,element2[,...]>
Pst Viewer GUI elements:
Toolbar buttons:
UPDATE_POLICY
Choose update policy.It can be found in Help menu.
Usage: UPDATE_POLICY="Never" | "Ask" | "Auto"
Options for update policy:
GUILANG
Set the language for Pst Viewer Pro interface.
Usage: GUILANG="<language>"
The list of languages that Pst Viewer Pro supports:
/exelang
Set the language for installation process.
Usage: /exelang <LangId>
The table with different <LangId> can be found here:
Example (to install French version):
Pst Viewer .Setup.exe /exelang 1036
<file_extension>_ASSOC
Associate Pst Viewer with msg, eml, pst or/and ost files.
Usage:
Usage:
msiexec /i Pst Viewer .Setup-4.x.x.xxxx.msi /qn PIDKEY="xxxxxxxx-xxxx-xxxx-xxxx-xxxxxxxx" GUILANG="French.fr-FR" GUIFLAGS="FWD,REP,FTP" ALL_ASSOC=1,
or
Pst Viewer .Setup-4.x.x.xxxx.exe /qn PST_ASSOC="1" MSG_ASSOC="1" GUIFLAGS="FWD,REP,FTP,NUP"
Status bar

Status bar shows description of hovered user interface elements, name and progress of current action, number of messages in active folder and other information.
[ Back ]
Pst Viewer Pro's docking functionality helps you configure the user interface convenient by changing the default position of the panels.
Docking use drag-and-drop for window placement. Panels may be docked to the top, left, bottom or right edge of a form (or user control).
Usage: Start dragging and you will see exactly where the dragged panel can be docked. Small markers will indicate sides where the panel is allowed to be docked (see the image below).
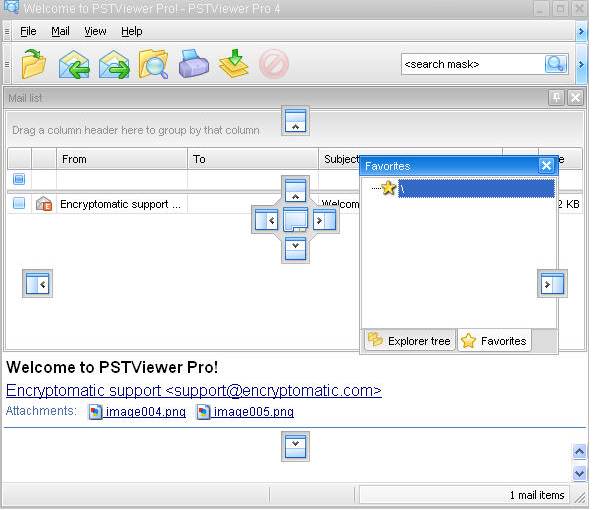
View menu contains ‘Change docking to default’ item that allows user to set all panels to default positions.
[ Back ]
© 2005, Encryptomatic LLC. Fargo, ND, USA.